Jordan Hawker

ember-sinon-qunit v4: Consolidation & Simplification September 06, 2019

If you’re an Ember developer, it’s likely that you use QUnit to test your projects. If you also SinonJS to create spies/stubs for mocking out methods in your tests, this post is for you. As many people who’ve used Sinon discovered over the years, one of the risks of a test mocking strategy is failing to clean up after yourself. This can cause mocks to leak between tests, creating failures that are difficult to debug.

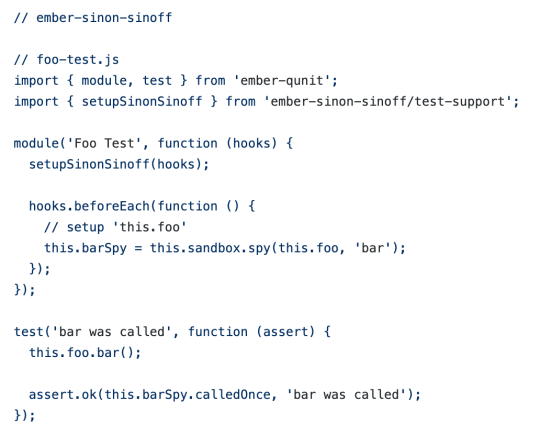
I created ember-sinon-qunit back in 2015 to give developers an easy way to create and cleanup mocks by injecting Sinon’s “sandbox” concept into the QUnit test() method. Two years later, Steve Calvert released ember-sinon-sandbox, providing an approach to this problem that incorporated the new hooks-style testing in ember-qunit. Earlier this year, he also released ember-sinon-sinoff as a continued evolution of that pattern. Let me show you a few examples for comparison:

image

The old pattern used by ember-sinon-qunit (shown above) required setup for every test and confusingly replace ember-qunit’s test function with its own wrapper. ember-sinon-sandbox improved on this by replacing the test wrapper with proper QUnit hooks:

image

This eliminated the test wrapper entirely and adopted the now-familiar hooks testing pattern. The result felt a lot more ergonomic and less confusing for developers. The same pattern existed for ember-sinon-sinoff as well:

image

You may have noticed a common problematic thread in each of these approaches, however. First of all, you have to do this in every test module, which means that developers may see you using Sinon in one test, add it to the new feature they’re developing, and forget to import the extra code necessary for the “automatic” cleanup to take place. While the one-time setup introduced in Steve’s addons provided a better alternative to solve this problem, a second issue existed. By proxying Sinon functionality into the test context via this, these addons were now responsible for maintaining the full surface area of Sinon as it continued to evolve over the years. This became very apparent when several issues were filed to add fake timers and other features to ember-sinon-qunit, all of which were perfectly reasonable requests.

This spring, we decided that this problem needed a single, unified solution that maximized the developer experience and worked with any style of Ember testing. After a lot of discussion on how to solve all of these problems, I’m proud to announce the v4 release of ember-sinon-qunit! We’ve completely reworked this addon from the ground up, deprecating the old approach as well as both of the other addons in favor of what we believe to be the most developer-friendly approach. Developers will now be able to hook up our Sinon integration once (in test-helper.js) for their entire project and never have to remember cleanup again!

ember-sinon-qunit’s one-time setup is adapted from the “Global” approaches Steve introduced in his addons, so those users may find this pattern familiar. However, once you’ve done this, any test can use the imported sinon object directly without relying on anything being injected into the test context! Take a look:

image

Once you’ve executed the setupSinon method, you never have to think about cleanup again! No matter how many test modules you add to the project, developers won’t have to worry about accidentally forgetting to clean up their spies and other mocks. The tests themselves become a lot cleaner as a result.

image

By eliminating the injected Sinon methods (or sandbox object), we’ve altogether removed the need to maintain a proxy for that library’s API. Developers are now free to use Sinon the way they would in any non-Ember project; by simply importing the sinon object into their tests and using any feature they need! You can see all of the above examples together in this gist.

Whether you’re an existing user of ember-sinon-qunit, ember-sinon-sandbox, ember-sinon-sinoff, or have simply been using Sinon by itself, we’ve got a migration path ready for you. Check out our new and improved README to learn how you can adopt this new pattern today. While the old patterns in ember-sinon-qunit were deprecated, they are still supported for backwards compatibility until the next major version, allowing you to adopt our new approach today while removing the old test wrappers over time. We also have an open issue to create a codemod for vanilla Sinon users trying to migrate from the old createSandbox method.

Developers shouldn’t have to think about whether they’re accidentally introducing state leakage between tests; the tools should just protect them by default. Steve and I hope you find this new approach easier to use than ever, so go check out the brand new ember-sinon-qunit today!

The American Dream is Dead April 30, 2018

It is ludicrous to assert that people in my generation are able to easily buy a house in their 20s, much less straight out of college. If I, someone with all the luck and privilege in the world, could only manage to buy a house in my 30s by stretching my finances to their thinnest, how is the average person in my generation supposed to buy a house for themselves in their 20s? How are they supposed to do it while supporting a family and children? How are they supposed to do it while paying off massive student debt and working a minimum-wage job?

First, let’s take a step back and talk about my story, because everyone’s personal story affects their perspective. I’m a 30-year-old millennial. I graduated with zero student debt, because my parents were upper middle class and paid my tuition costs alongside generous waivers granted by the University (my mom was a state employee and my dad was a veteran). This also allowed me to earn a Master’s degree debt-free before ever entering the workforce.

I work in one of the highest-paying industries in the country (Tech) for one of the most successful companies in my industry (Amazon). I have gotten over 1/3 of my net worth from a trust fund set up by my grandfather, who was a successful Realtor. I have a near-perfect credit score. This isn’t a humble brag; I’m lucky to be where I am in life. Even with all of this relative privilege and financial success, I was not able to buy a house in my 20s.

image

I’m buying a house this year, finally, and I’m doing so for more money that I have ever had in my entire life, including my current retirement savings. I am barely able to cover my monthly mortgage payments on this new house and still afford my other normal life expenses. I don’t say this to complain; I’m relatively happy with my life, and I don’t have a lot of concerns when it comes to finances.

Caveat: I might have been able to buy a house already if I had continued to live in a part of the country where both housing prices and salaries are severely depressed compared to where I am now (one of the most expensive and highest-paying areas of the country). My first job was in one of the cheapest cities to live in the US (St. Louis), where houses cost ~¼ as much as they do where I’m living now. However, my income was 1/5th of what I’m making now, so even accounting for salary growth over time, this only would have been possible because of the trust fund from my family AND my complete lack of any form of debt.

I’m not married. I don’t have kids. I don’t have any debt whatsoever. I’m not the majority, however. In fact, I’m extremely lucky to be in the top 1% of my age group, financially. If you read this post and can’t relate to my situation, you’re not alone. You might say I’m a statistical anomaly, but I’m also the result of generations of privilege and systematic oppression. I didn’t earn this place in the world, the world gave it to me. Most of my generation will never have the advantages and opportunities that I had.

Let’s Talk About Statistics

At the end of the day, this is just another anecdote. Your anecdote does not invalidate my anecdote, nor does mine yours. You may know someone who has achieved the “American Dream”, or maybe you’re even one of the “lucky” few yourself. Hell, you might even think that I’m “out of touch” because of my financial situation or because I live in one of the most ludicrous parts of the country when it comes to housing and employment. However, statistics don’t lie, and the current situation is bleak (to say the least) for the typical young person. The share of first-time home buyers in the housing market dropped near an all-time low in 2015, and the median age for that group is now 32, several years higher than what it was for older generations. The average Millennial makes 20% less than Baby Boomers did at the same age, after adjusting for inflation. Many of their costs, however, have far outstripped the rate of inflation.

image

Source: Business Insider - “Here’s How Much Millennials Are Earning Annually Across The US”

According to the US Census Bureau, median wages for the 25-34 age group have risen 14% from 1970 to 2016, after adjusting for inflation. However, another inflation-adjusted comparison shows that median housing prices rose over 100% from 1970 to 2006, the most recent year that data is available from the same source. Home prices dropped after the recession in 2007, but they recovered and exceeded those highs by 2016. Adjusting for inflation at 2016 prices, growth is still over 100% in that time period. Can anyone honestly say that 14% wage growth is sufficient to cover that gap?

While Millennials struggle to earn enough money to buy a home, older generations are increasingly unlikely to sell their current homes. This keeps inventory low and contributes to meteoric rises in housing prices. In 2016, home ownership was at its lowest in 50 years, and 37% of all homes were purchased for investment purposes. Rich people are buying homes to rent to people that can’t afford them, which in turn is driving up prices and lowering available inventory. That trend contributes to a vicious cycle that continues to drive down home ownership rates.

image

Source: Robert Shiller - “Irrational Exuberance”

Millennials Are Losing Money

Without even accounting for student debt, the average millennial’s income is lower than their cost of living. That makes it difficult to save money to pay back their debt, much less accumulate enough assets to purchase a home for themselves. Some people would like you to believe that they pulled themselves up by the bootstraps, earned everything they ever got for themselves and were able purchase their own home at a young age. Some of those people are even millennials. The fact remains, however, that most people in our generation don’t have the opportunity to accomplish this, no matter how hard they try and how good they are at their jobs.

One might think to themselves, “If people are married, they can combine their incomes to buy a house. Why wouldn’t that work?” Let’s unwrap those assumptions for a second. First, that’s assuming that both people in a relationship make equivalent wages, or at least that one of them is above average to offset the other. Second, that someone is married at all in the first place. Third, that people who don’t fit the first two assumptions aren’t worthy of owning their own home unless they far outstrip their peers in terms of annual income and existing debt. None of these assumptions hold up under scrutiny, and they certainly don’t match up with how Americans have historically afforded their own homes.

Let’s Do The Hard Math

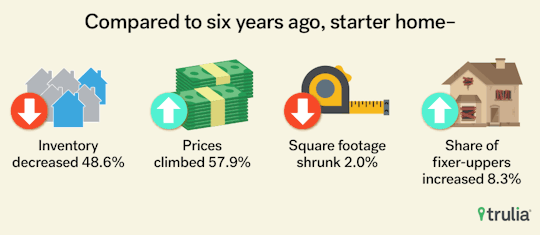
The median millennial income in Q3 2017 was ~$40,000, as we saw previously. The median home price at the same time was $320,500. A standard 20% downpayment on that home would be $64,100. Mortgage rates (30 yr fixed) were near all-time lows at ~3.9%, making the median monthly payment ~$1,209.36. That means $14,512.32/year in mortgage payments, plus insurance and property taxes. Standard advice says around 28% of your income should go toward these costs, which for the median millennial salary would be $11,200. That’s SIGNIFICANTLY less than what you would have to spend to own a house, and that’s not even accounting for how you managed to save the $64,000 required for a down payment.

Now, you could argue that young people shouldn’t be able to buy the median home, but how much home can they even afford? The median property tax in the US is around 1.15%, and the average cost of homeowner’s insurance is $300-$1000. Let’s say $650 to be generous and take the middle point. So already that $11,200 is down to $10,550. If you buy a $185,000 home, you pay $2,127.50 in property taxes on average, and your mortgage payment could be $698.07/mo, which comes to $10,504.34/year after taxes. So the median millennial can only afford a house that is 43% BELOW the median house price. There’s no way that adds up, because it means people below the median can’t even afford close to that amount!

image

Source: Trulia - “The American Starter Home: Expensive, Small, Broken Down, and Hard to Find”

The Whole Picture

Keep in mind that everything I’ve discussed above is talking about the “average American”. I haven’t even delved into income and opportunity disparities by gender, race, or education. In fact, that topic is so large that there’s no way I could do it justice in this post. However, I would be remiss if I didn’t mention it altogether, because American inequality is only getting worse over time. This means that while things look bad for the median millennial, they’re even worse on average for someone who belongs to one or more disadvantaged socio-economic groups.

The entire premise of “everyone should be able to buy a house and support a family in their early 20s” espoused by older generations is complete bullshit. Without higher-density housing, wage increases, student debt forgiveness, and affordable higher education, future generations will have it even worse than we do today. We must tackle these problems today to have even a hope of giving them a better America years from now. Otherwise, the American Dream is dead.

Twitch Chatbots In The Cloud February 24, 2018

So you’re streaming on Twitch, and you want a chatbot for your channel? Great! Many content creators start out with a hosted option like Nightbot, but they often realize the custom benefits of self-hosted bots like Ankhbot or Deepbot. Here’s the challenge, though; if, like many people, you host your chatbot on your own PC, you have to remember to start the bot again any time you restart your computer. If you want the bot to be running 24/7 (for example, if it has Discord integrations), you can’t afford to turn your PC off when you’re not streaming. However, there’s an alternative that solves this problem: cloud computing.

image

If you can host your chatbot on a virtual machine, you don’t have to worry about adding yet another piece of software to manage on your stream PC. Then again, if you don’t have a VM laying around somewhere in the cloud, who wants to add that cost to their streaming expenses? This is where Amazon Web Services (AWS) comes into play. They provide a free tier of a VM product that we can use to host any bots we want to run 24/7. I’ll walk you step-by-step through the entire process to get your chatbot up and running smoothly on a virtual machine!

Reading Time: 15 minutes, Setup Time: 30 minutes, Total Time: 2-3 hours (See AWS signup note below)

Choosing A Chatbot

For the purposes of this guide, we’ll be using the Streamlabs Chatbot, formerly known as Ankhbot. I strongly recommend this great bot for any streamer; it has all the tools you’ll need to run your channel smoothly. However, this same process should work with any self-hosted bot, though a few minor steps may be different depending on your bot’s requirements. If you’re already running your own bot locally, read on! I’ll also include instructions for how to transfer your bot to a VM without losing your existing data.

Sign Up For AWS

The first thing you’ll need to do is make sure you have an AWS account. Visit aws.amazon.com to sign up if you don’t have one yet. Most people will choose “Personal” as their account type, unless they’re signing up on behalf of a business. You’ll be asked to enter a credit card to verify your identity, though it won’t be charged within free tier usage. Just running the chatbot would not exceed any the free tier limits, and I have not been charged in months of running two of my own bots. Some aspects of the free tier do expire after 12 months, though; while I believe you should be able to run the bot for free indefinitely, don’t quote me on that. I’ll certainly report back here if I find out differently, since I’ve been running my bots for several months already and will pass the 12-month mark in mid-2018.

You’ll also need your phone handy so AWS can call you to enter a PIN for additional verification of your signup. Finally, you will likely choose the Free support tier, as opposed to a paid support system.

Note: Newly created AWS accounts can take up to 24 hours to be fully available. If you do not have an account yet, sign up now and then check back later in the day to complete the rest of the steps in this guide. In my case, it took 1-2 hours to have my account approved.

Create A Virtual Machine

Once you’ve signed in to your AWS account, it’s time to create your virtual machine. In the “Build a Solution” section of your home (Console) page, you should see a link to “Launch a virtual machine”. This will give you the choice of either an EC2 or Lightsail Instance, of which you’ll want to select EC2. After naming your instance, pick Windows Server 2016 Base as your operating system.

image

Stick with the default options and click through to create a key pair. You will download a (.pem) file that contains the private key for accessing your virtual machine. Store that key in a safe place, as it’s necessary for the later steps. With all options selected, it’s time to tell AWS to create your instance. After a few minutes, click “Proceed to EC2 Console” to access the virtual machine.

Set Up Security Protocols

In order to use this VM, you need to be able to connect remotely to setup and manage your chatbot. Before you connect, though, you’ll need to set up a security protocol to protect who can access it. This may be done by limiting it to your IP or other filters, but for the purposes of this guide, I’m going to show you how to open up your security protocol to be able to access it from any computer/IP that has the secret access key you downloaded earlier.

image

From your EC2 Management Console, click “Security Groups”, and then “Create Security Group” (or edit the default one that was . Give your group a name and description, and then enter the following rules for both inbound and outbound:

image

Please note that this will allow any traffic to communicate with your VM, though remote access will still provide the aforementioned private key. If you are interested in setting up more restrictive rules, refer to the AWS Documentation for further help.

Once you’ve created your security group, click “Instances” to get back to your VM instance. Check the instance you want to change, and then click Actions->Networking->Change Security Groups. Make sure to select your modified security group and assign it to this instance. Now that you have security rules in place, it’s time to finally connect to your VM!

Connect To A Virtual Machine

In order to access a VM, you will need remote desktop software. Feel free to use your favorite, but Microsoft’s Remote Desktop product will work just fine. For this guide, we’ll use Microsoft Remote Desktop for MacOS. Click “Connect” from the Instances page of your EC2 Management Console to download the files necessary for a remote connection. The Remote Desktop Protocol (.rdp) file will tell your software how to find the VM, now we just need the password. This is where the (.pem) file you downloaded earlier will come into play.

image

Click “Get Password” and upload the private key file to decrypt the VM’s password. Open your Remote Desktop software and, using File->Import, import the (.rdp) protocol to set up your connection. Right-click on the new connection in the list and select “edit”. Copy the password you decrypted into the “password” field of the connection, and, optionally, give that connection a name to make it easy to identify. Close the connection details to save, and then double-click on it to connect to your VM. This will launch a remote connection, giving you control over the VM you’ve set up!

Setting Up Your Chatbot

image

Once you’re connected, download the installer for the bot. While Internet Explorer is serviceable, on AWS VMs the default security settings are annoying and overly restrictive. So visit www.google.com/chrome to download and install Google Chrome, or do the same with your favorite browser. IE will tell you insecure content is being blocked from various Google sites repeatedly while you do this; each time, just click “Add” twice and close the dialog to bypass the security warnings. Once you download and install Chrome, use it for all future downloads to make things easier.

Visit the Streamlabs site to download the installer and run it. Once installed, start the application and you will be taken through the setup wizard for your bot! If you already have an existing bot to transfer, skip the wizard and read below.

Backing Up Bot Settings

Most bots include a backup/restore system that protects you from losing your data. In the case of the Streamlabs Chatbot, you can refer to page 16 of their documentation for help with setting up a backup through Google Drive, Dropbox, or your favorite cloud platform. Once that’s set up, you’ll be able to ensure that your bot data is safe in case you ever need to transfer the bot to a new computer.

In fact, let’s say you’re already running a bot on your stream PC, and you want to set it up on the VM without losing any of your precious data. These cloud backups can be used to transfer the bot to the VM. After backing up the existing data, you can install the same cloud platform (ie Google Drive) onto the VM. Then, set up your new bot’s cloud settings to point to the folder the backed up data is stored in locally, and click “Import Backup” to target the latest backup file for your bot. This will allow you to keep running the same bot you had before without having to go through the full setup steps again!

Managing Your Bot Remotely

image

The most annoying part of hosting your bot on a VM is making configuration changes like adding new commands. Fortunately, many bots allow for an “Editor” role that gives users (such as your moderators) access to manage the bot from your Twitch chat. You can easily give yourself the same capabilities by adding your own Twitch account as an editor!

Downsides

Is running your chatbot through a virtual machine the silver bullet solution to all your bot hosting needs? Not necessarily. While it provides a lot of convenience to give your bot 24/7 uptime, it has a few drawbacks. In particular, features that are meant to integrate directly into your stream will be difficult, if not impossible to use. This includes things like song requests and sound effects that are handled by the bot. There are a few options for working around this, however:

  • Host these features through a separate bot: You can either install a second instance of the same bot on your local machine that you only use for these features (allowing the remote bot to handle the rest), or you can use a different bot (such as Nightbot) that implements one or more of these features.
  • In an ideal world, Streamlabs would leverage integrations between the chatbot and their other features to allow your remote chatbot to play music & sound effects via a browser source, the same as their other widgets. In fact, I’ve submitted this suggestion to Streamlabs, so feel free to track its progress for updates.

Questions

Hopefully I’ve provided a thorough step-by-step guide for setting up your very on VM-hosted chatbot. If you have questions or run into any issues, feel free to reach out to me on Twitter or check out the Streamlabs Chatbot Discord. I’m happy to do whatever I can to help you realize your bot hosting dreams. Best of luck, streams!

Civil Discourse Isn’t Enough November 11, 2016

I am all for civil discourse, but I also possess all of the privileges of the world that allow me to engage in it without fear that failure to convince in that discourse will ultimately affect me in some profound way. It would behoove us all to recognize that there are many people in this country who do not have that privilege. These people have voices that have gone unheard for decades, if not for the entirety of America’s existence as a country (or longer).


image


Many of these people now literally fear for their life because we elected a man who tells American citizens that it’s ok to be physically abusive to women. We elected a man who tells Americans that it’s ok to physically attack people of color and non-Christians. We elected a man who tells Americans it’s ok to cheat people out of their fairly earned wages, as long as you get ahead in life. We elected another man who tells Americans it’s ok to have their children electrocuted to stop them from being gay. We elected another man who tells Americans it’s ok to tell women what they are and are not allowed to do with their own bodies. Even if you argue that some of these things were not explicitly said by those candidates, it is inarguable that their election validates the common perception that these men stand for those things. As a result, Americans everywhere are having their every racist, sexist, xenophobic, religiously intolerant thought validated by the men we chose as a country to elect to the White House.


image


We have to understand that for the people marginalized by this social oppression, civil discourse has already failed them. They have been attempting civil discourse for a very long time, and America as a society continues to tell them that their lives don’t matter. We have not and continue not to care about their ability to co-exist peacefully and have the opportunity to prosper in this country. So it’s hard for those people to continue having civil discourse after we elect a straight white cis-male billionaire who is perceived to support ideals that directly devalue their lives.

Progress never happens because of civil discourse. Progress happens through revolution, when society is presented with a united voice so loud that ignoring it causes significant “inconvenience” for those in power. History has borne this out time and again, so we should not be surprised. Sometimes it takes the form of Rev. Martin Luther King, Jr, sometimes it’s the more violent form of Malcolm X. However, even the Reverend himself recognized that civil discourse wasn’t enough.

In 1963, MLK wrote the following words in his landmark “Letter from Birmingham Jail” missive:

First, I must confess that over the last few years I have been gravely disappointed with the white moderate. I have almost reached the regrettable conclusion that the Negro’s great stumbling block in the stride toward freedom is not the White Citizen’s Council-er or the Ku Klux Klanner, but the white moderate who is more devoted to “order” than to justice; who prefers a negative peace which is the absence of tension to a positive peace which is the presence of justice; who constantly says “I agree with you in the goal you seek, but I can’t agree with your methods of direct action;” who paternalistically feels he can set the timetable for another man’s freedom; who lives by the myth of time and who constantly advises the Negro to wait until a “more convenient season.”

Shallow understanding from people of goodwill is more frustrating than absolute misunderstanding from people of ill will. Lukewarm acceptance is much more bewildering than outright rejection.


image


That’s not to say that he doesn’t believe in pursuing legal paths to equality, but rather that those of us with privilege need to hear them in order for that course of action to succeed.

My friends, I must say to you that we have not made a single gain in civil rights without determined legal and nonviolent pressure. History is the long and tragic story of the fact that privileged groups seldom give up their privileges voluntarily. Individuals may see the moral light and voluntarily give up their unjust posture; but, as Reinhold Niebuhr has reminded us, groups are more immoral than individuals.

Ultimately, we must recognize the wisdom of his words; that it’s not ok to sit back and pretend to be allies in pursuit of the end of oppression. We must accept that where civil discourse has already been shown to fail time and again, it is reasonable for people to rise up and speak with a different tone of voice. It is inexcusable for us to simply pat those people on the head and say “Shhh, calm down, it’s going to be alright…eventually.” We must respect the fact that sometimes extraordinary measures are required in order for people to be heard.

Are you listening?

Ember Spotlight #6: Ember-Pagefront October 20, 2015

If you haven’t heard already, popular static hosting site Divshot was acquired by GoogleFirebase last week. For those of you using them to host your Ember apps, know that the service as we know it will cease to exist on December 14th, 2015. Furthermore, because Firebase hosting is inferior to Divshot, those of you who want a custom domain for your sites will not be able to simply migrate over to their new offering without forking over a subscription fee. Life as we knew it with Divshot is over, unfortunately.

Despair not, however! In walks Pagefront, the dedicated hosting solution for Ember applications! Using their simple addon Ember-Pagefront, you can easily deploy your projects to production in minutes. Simply follow these steps:

  1. Create a Pagefront Account
  2. Add an app in the Pagefront dashboard to represent your application deployment
  3. Copy the installation command from the dashboard an execute it from the command line.

That’s it! Now you will be able to deploy your app to Pagefront with ease using the `ember deploy` command.

For my Open Source Good Deed™, I upgraded the addon’s dependencies and removed a lot of the unnecessary dependencies that came from Ember-CLI’s addon generator. I also added the above instructions to their README, since this relatively new service doesn’t have full documentation yet. Even so, I strongly encourage you to check out Pagefront; whether it’s for a personal website, an addon demo page, or a full-fledged ambitious application, Pagefront seems ready to serve the needs of the Ember community!

#DontPaySlack: That Annoying Hashtag Might Be Right October 19, 2015

You might have recently seen this Twitter campaign run by upstart team communications platform Ryver; I’m sure their marketing team thinks any press is great press, but they largely annoyed their target market into discounting them entirely. However, it turns out they might actually be right. While this certainly isn’t the #slackVsRyver showdown that Ryver CEO Pat Sullivan is hoping for (as you’ll see by the end of this article), the time has come to take a hard look at whether Slack is actually the right fit for your team.

Why Leave Slack?

Warning bells started to ring back in June with freeCodeCamp’s article about their move from Gitter to Slack and back to Gitter again. You can read their article in full, but the gist is this: Slack doesn’t support large teams. Despite all of their marketing assuring users that there is no limit to team size, their APIs have a hidden limit that will prevent you from inviting new users after a certain point. For small teams, this isn’t a problem, but if you’re running a large code camp or OSS community with thousands of members, you’re heading for a world of hurt. More recently, other communities such as Reactiflux have begun hitting this limit as well. Ultimately, Slack’s servers can’t handle the load of communities this large, and building support for this into their infrastructure flies against their overall product goals of focusing on small teams. As such, Slack has decided not to allocate resources toward improving this problem.

Additionally, Slack is one of the only team chat platforms that does not preserve all history for the free tier of their product. Once you hit 10,000 messages, Slack will no longer show you the earliest messages in your history, even through search. Sure, you can pay them to remove this limitation, but their per-user-per-month pricing strategy makes this cost-prohibitive for large teams. Even more, why pay for a feature that every other major collaboration platform gives you for free?

Slack has a lot of great things going for it: appealing design, great integrations, slick, performant apps on just about any platform, not to mention fun features such as custom emojis and reactions (a feature that no other platform has yet!). As it turns out, however, there are a number of great team collaboration alternatives available, all of which are free (or have free tiers) and can compete with Slack’s dominance of the market.

Comparing Team Chat Platforms

Given the premise that many, if not most, OSS communities are going to need to search for a new home away from Slack in the near future, I set about to research alternatives that could hopefully provide a sustainable new home for thriving communities. The Reactiflux community was instrumental in assisting my research. In my comparison, I only considered the free tiers of the various platforms; many of them had paid tiers that provide additional features, which should certainly be taken into consideration if that is in the cards for your team. However, it is important that a true alternative be sustainable for a community that does not have extensive funding of its own to pay for a service like this. I compared about a dozen different team collaboration platforms (including Slack itself), and though I will only go into detail on about 6 or 7 of them today, here’s the full list, in alphabetical order:

In order to perform my comparison, I identified a number of features that were prevalent in these platforms and deemed a value-add for team chat. Check out my Feature Comparison article for an in-depth look at each feature and which platforms supported them. For now, though, let’s focus on a high-level look at some of my favorites. I’ll give a brief overview of the platform’s background, a few pros and cons as well as a unique, cool feature that differentiates it from other platforms. I’d also like to credit the folks at Reactiflux for a great discussion I was able to be part of in identifying a lot of these points.

Slack

Slack is the reigning king of team collaboration, with a valuation of almost $3 billion as of their April 2015 financing round. It has certainly been the darling of Silicon Valley, and not just in VC funding, either. The platform passed 1 million daily active users back in June and shows no signs of stopping.

Pros:

  • Amazing product, people love it!
  • Since many teams use Slack, a lot of your team members may already have it open by default, making it a natural choice with good org-switching capabilities.

Cons:

  • History is limited to 10,000 messages
  • Teams do not actually have unlimited users, making it impossible for large teams to scale well.

Unique Feature: Reactions

Reactions are Slack’s way of killing the +1 phenomenon; that is the endlessly useless replies of people who simply want to show agreement to someone else’s message. With reactions, users can attach any emoji to a message, allowing them to react to another user’s content without stretching out the chat log with messages that otherwise lack content.

Gitter

Gitter is a chat platform geared specifically around its GitHub integration. Initially the platform focused around creating one channel for each repository, to provide a place for OSS teams to discuss their project. Now, organizations can have channels and custom channels can be created for a team as well.

Pros:

  • Proven Scalability (they have at least one community with over 50,000 users)
  • Simple login through GitHub, which is great for OSS communities where nearly everyone already has an account

Cons:

  • Apps are subpar and buggy, especially on mobile
  • Channel Organization isn’t entirely clear, especially as they related to different orgs. No explicit org-switching exists; all channels you have joined are added to a combined list

Unique Feature: GitHub Integration

Gitter is tightly integrated with GitHub and other services, allowing a powerful cross-over between chat and project activity such as pull requests, CI builds, etc.

Discord

Discord, a recent entrant to this space, launched with a focus on the gaming community. The apps all have an incredibly polished design on the level of what we’ve come to expect from Slack. In spite of their focus on games like League of Legends, Dota 2, CS: GO, and Minecraft, the team has been very receptive to other communities using their service. In fact, they recently added code blocks to their latest release specifically to support the Reactiflux community switching to Discord (and their product is built with React!).

Pros: 

  • High quality voice chat in separate rooms (users can opt-in)
  • Granular role & permission management with far more depth than other platforms

Cons:

  • Search hasn’t been implemented yet, but it’s on the roadmap
  • Some percentage of users may have trouble accessing it from work, since WebSense and other corporate filters classify it as a gaming application

Unique Feature: Instant Invites

Discord is the easiest platform to join out of all the products I evaluated. Their “Instant Invites” feature allows you to generate invites to a specific channel that bring users into the chat without even having to fully register an account (just provide a name!). Users can then “claim” their account at any point before disconnecting in order to be able to regularly login to the chat. This is a critically useful feature for OSS communities, as it allows new users to easily jump into chat and ask questions without having to register. Even more, these invites can be set to expire after a certain period of time, and they can even be set such that people who accept them cannot register, which is great if you have a private chat that you want to add someone to temporarily without allowing them to register to your server permanently.

Rocket.Chat

This fully open-source platform is the ultimate answer to self-hosted chat. Rocket.Chat has an incredible breadth of features, including voice and video chat, and an active team supports continued development of the product.

Pros:

  • Open-Source means that if your team is technically inclined, you can implement features you need and contribute them back to the project
  • Voice and Video conferencing

Cons:

  • Self-hosted, meaning each team is responsible for their own platform stability and troubleshooting (with the OSS community as a resource)
  • The apps look nice, but not as polished as Slack, Discord, or Gitter

Unique Feature: Social Login

Rocket.Chat has a wide variety of login options through third-party social auth, in addition to the normal username/password. That makes it very easy to onboard users, though not as easy as Discord.

PureCloud

Interactive Intelligence provides PureCloud Collaborate as part of their freemium solution within a larger enterprise suite. This relatively new app is built with modern technologies including EmberJS, and the team is very dedicated to building a great product. They’ve been very responsive to feedback, and while they rank in the middle of the pack (which isn’t necessarily bad) as of this writing, the list of features I’ve heard about for their upcoming release is sure to launch them into contention with the best of the best.

Pros:

  • Strong focus on a larger enterprise-focused platform that will include other related products
  • The most advanced user profiles of any platform in this list, enabling a lot of powerful features 

Cons:

  • “Feels” like an enterprise application; that is, not as “fun” as Slack or Discord, but still very polished
  • Still missing some important features such as Org-Switching, Search, and Message Editing, but those are all coming soon in their release cycle

Unique Feature: Dance Party!

Type “/dance” in chat and be treated to an epic dance party featuring a long-time chat friend, Kirby! (>’.’)>

Conclusion

My weighted scoring system only played a small part in giving me a good overview of the capabilities of each platform. For those of you who are interested, however, here’s how they stacked up:

RankProductScore (Max 50)
1Discord39.75
2Slack39.5
3Gitter38
4Rocket.Chat37
5ChatGrape37
6HipChat35.5
7PureCloud32.25
8IRCCloud28.375
9Ryver28
10IRC24.5
11Let’s Chat13

Take those “results” with a grain of salt, as your preferences may vary widely from mine. Ultimately, though, after much testing I did in fact decide that Discord was my favorite product of the bunch. It’s an incredibly well-built product, and though it’s missing one or two important features, the team has been quick to address any requests from their users. Instant Invites is really the game-changer here; for an OSS community, the ease of onboarding users to this app is unrivaled by the other competitors. Their voice chat is extremely high quality, and the permissions granularity will be very useful for moderating a community.

Just to prove what I’m talking about with the instant invites, here are a few invite links:

  • Reactiflux’s official chat can be found on Discord!
  • I created an EmberJS Discord for evaluating the platform
  • Here’s an instant invite to the #help channel so you can get instant assistance rather than being dumped into #general

Keep in mind that the landscape of this industry is constantly changing. These teams are all innovating and developing new features every week; I may try to keep my comparisons up-to-date, but ultimately each platform will (hopefully) fix the holes in their offerings. You should evaluate them yourself before making a decision; if you notice something new (even an entirely new platform) come back and let me know in the comments!

Wait! What About Ryver?

I teased you with them in the beginning and then never gave you my thoughts, right? Well, frankly, it’s because they aren’t even in the running. You can see from the weighted scores that they rank below everything but IRC and Let’s Chat, making them a marginal solution at best. Ryver’s setup is so backwards that they think each team only needs one channel; you have to make a new "team” and add individual members to that team every time you want another channel. Ultimately, they lack a lot of the features that make these other products great, and their marketing team has launched them into the spotlight far before they were ready to be a competitive player. Ryver needs time to go back to the drawing board and re-assess their features before making a strong push into this industry again. They did get one thing right, though. #DontPaySlack (with much love and utmost respect to the Slack team, <3!)

A Note About IRC:

I included IRC in my comparison even though it’s not a “platform”, per-se, because it often gets mentioned as an option in these discussions. However, scoring it proved difficult due to client fragmentation; many of these features are more client sugar than anything else, so while an individual user could customize their experience to get these features, I tried to consider the cross-section of what an average user would have access to by picking one of the many available IRC clients. IRCCloud, on the other hand, is a specific platform that merited a separate consideration given its more modern feature set.

Team Chat Platforms: What Features Add Value? October 19, 2015

The tech industry has been awash with modern team collaboration platforms for years, but the recent rise of Slack has put a renewed focus on the ultimate question: what makes such a platform simultaneously effective and fun to use? Given Slack’s recent push against supporting large OSS communities, I embarked on a research journey to find out what makes a great collaboration platform. Check out my platform comparison article for more details about the apps I considered, and then come back here to find out about the important features that added value to each platform.

To create my comparison, I first looked at whether each feature was supported, identifying the most important features to help shape decisions of which platform to use. I weighted each feature from 1-4, with 4 being the most important features, creating a total possible score of 50. Furthermore, each product was given a multiplier indicating their support for that feature:

  • 1x: Fully Supported
  • 0.5x: Partially Supported
  • 0.25x: Coming Soon
  • 0x: Not Supporting

Subsequently, it was possible to achieve a multiplier of 0.75 if the platform had a partial implementation with improved features coming soon. At the end of the day, the resulting score won’t necessarily have a ton a meaning unless you would rank the features in the same way I would, but it provided good insight for me to get a high-level view of which platforms had great feature support across the board. I won’t go over every single feature I considered, but if you’re interested you can see my notes in this Google Spreadsheet.

Multi-Organization

Weight: 4

Supported: ChatGrape, Discord, IRC, IRCCloud, Slack

Partial: Gitter, HipChat

Coming Soon: Rocket.Chat

In this age of constant online communication, people need access to a number of different teams they belong to. As such, it’s vitally important for a team collaboration platform to support easy org-switching so that you can manage all of your teams from the same interface without having to open multiple tabs or constantly log in and out of each team. About half the platforms I looked at had great support for Multi-Org, while the others struggled to provide a solid experience.

Hosting

Weight: 4

Supported: ChatGrape, Discord, Gitter, HipChat, IRC, IRCCloud, PureCloud, Ryver, Slack

One thing most teams don’t want to deal with themselves is hosting. You just want a platform that works and lets you be productive; you don’t need the headache of hosting the product on your own servers. This is especially true for large OSS communities, where reliability of the chat is critical to handling the huge user influx. It’s generally much preferable to have a platform where hosting is taken care of for you, rather than having to find someone within your team who can dedicate their time to upkeep of the service. Nearly every platform came with hosting, except for the fully Open-Source platforms Rocket.Chat and Let’s Chat.

Channel Organization

Weight: 4

Supported: ChatGrape, Discord, HipChat, Let’s Chat, Rocket.Chat, Slack

Partial: Gitter, IRC, IRCCloud, Ryver

Coming Soon: PureCloud

Channels are core to team collaboration; every great chat program has a way to create separate streams of messages where you can discuss different topics. In order to be considered as fully supporting this feature, I required platforms to expose an easily viewed list of channels for the team that makes room discovery effortless. Several of the platforms supported obtaining this list, but it wasn’t implemented in the most user-friendly manner, so I marked them as Partial.

Mobile Apps

Weight: 4

Supported: ChatGrape, Discord, HipChat, IRC, IRCCloud, PureCloud, Rocket.Chat, Ryver, Slack

Partial: Gitter

Communication on the move is essential to modern collaboration, so having a great mobile app is important for any platform. I will admit that my evaluation here is incomplete; I don’t own a smartphone on every platform, so I was unable to personally verify the quality of mobile offerings by each product. However, I have heard pretty consistent feedback that Gitter’s mobile offering is subpar and buggy, hence their Partial rating. I would be happy to downgrade other platforms whose mobile experiences are confirmed to be less-than-stellar; just leave your comments in this article for consideration.

Desktop

Weight: 3

Supported: ChatGrape, Discord, Gitter, HipChat, IRC, PureCloud, Rocket.Chat, Ryver, Slack

Partial: IRCCloud

Web apps are great, but in an age where many users have dozens of browser tabs open simultaneously, the ease of access provided by a desktop app vastly improves the user experience. Nearly every platform evaluated has a solid desktop app for Windows/OSX; many support Linux as well! IRCCloud received Partial marks for having some unofficial third-party apps, but they are working on their own solution, so I gave them a 0.75x multiplier.

History

Weight: 4

Supported: ChatGrape, Discord, Gitter, HipChat, PureCloud, Rocket.Chat, Ryver

Partial: IRCCloud, Let’s Chat, Slack

Ah, history…I bet you were wondering when I’d get to this one, weren’t you? As you likely already know, Slack’s free offering falls short here (at 10,000 messages) while many other platforms preserve full history for your perusal. IRCCloud’s free tier can preserve chat history from while you are connected to a channel, but it automatically disconnects you from the channel after being offline for 2 hours, so you lose the advantage of offline history collection that the other platforms have.

Search

Weight: 3

Supported: ChatGrape, Gitter, HipChat, Rocket.Chat, Ryver, Slack

Coming Soon: Discord, IRCCloud, PureCloud

What goes hand-in-hand with chat history more than search? Only about half the platforms evaluated are currently able to search their indexed history, though it’s important to note that this search is limited to how much history they’ve made available. PureCloud has search landing in an imminent release, and Discord has it on their roadmap (I’d be shocked if it wasn’t here by the end of the year). IRCCloud has this feature listed as Coming Soon as well, but the free tier will only allow searching back 1 week into the past, so I reduced their multiplier to 0.125x.

Roles & Permissions

Weight: 2

Supported: Discord, PureCloud

Partial: ChatGrape, Gitter, HipChat, IRC, IRCCloud, Rocket.Chat, Ryver, Slack

Moderating a large team is crucial to having a respectful and productive collaboration. Discord and PureCloud were the standouts in this category, with incredibly flexible action-based permissions that can be assigned to different roles, allowing an amazing granularity of moderation. Most of the other platforms had some basic admin roles that cover the common use-cases.

Markdown

Weight: 1

Supported: ChatGrape, Discord, Gitter, PureCloud, Rocket.Chat, Ryver, Slack

Coming Soon: IRCCloud

Markdown, for most users, is simply a way to easily make test into bold or italics. That said, it has a ton of great features, and technical teams especially find markdown an essential addition to their chat program. The next two “features” could be considered a subset of great markdown implementation, which is why I’ve weighted them each 1 to give the overall feature a weight of 3 to reflect its true importance.

Code Blocks

Weight: 1

Supported: ChatGrape, Discord, Gitter, HipChat, PureCloud, Rocket.Chat, Ryver, Slack

Partial: IRCCloud

Code blocks allow developers to easily share snippets of code in chat while making them distinct form the surrounding messages. This feature is essential for any technical team or OSS community; without it, much of the utility of the platform is lost for developers. Nearly every platform supports code blocks via markdown (single ` or triple “`), with two exceptions. HipChat uses a slightly awkward “/code” command, though the result is nearly the same. IRCCloud does not support an easy way to produce code blocks quickly, but it does have an integration with PasteBin to create new bins on the fly and link them within the chat.

Syntax Highlighting

Weight: 1

Supported: Discord, Gitter, IRCCloud, Rocket.Chat

Partial: HipChat, PureCloud, Slack

Reading code blocks can be made much more efficient by adding syntax highlighting for the language being used. Only four platforms seemed to fully support this feature within their code block implementation, while HipChat and PureCloud supported some but not all of the languages I tested. Slack, strangely enough, does not support syntax within code blocks, but it has a “snippet” feature (not unlike IRCCloud’s pastebin support) that includes syntax highlighting. Ultimately, since that is not the most common way to create code blocks, I decided to mark their support as Partial.

Editing Messages

Weight: 2

Supported: ChatGrape, Discord, Gitter, Rocket.Chat, Slack

Coming Soon: PureCloud

A more recent trend in group chat platforms has been a strong preference for the ability to edit messages after they’ve been sent. This is especially helpful for correcting typos on the fly, and a number of platforms have great support for this feature. Additionally, I’ve confirmed with the PureCloud team that this will be coming in their next update, along with a number of other features I’ve listed.

Integrations

Weight: 2

Supported: ChatGrape, Gitter, HipChat, Rocket.Chat, Slack

Partial: Discord, PureCloud, Ryver

Third-party integrations are incredibly useful to a collaboration platform; teams want to be able to hook their chat platform into other tools they utilize. Several of the platforms I looked at had a wide number of integrations available, while a few more had a small (but growing) count. Nearly all of the platforms, however, have a confirmed API by which teams can build bots and other custom integrations they might need.

Other Features

The above list is not exhaustive, but it does cover a wide variety of value-adds that modern team collaboration platforms must have to be competitive in today’s market. Here’s a quick list of some other important features I didn’t mention:

  • Voice Chat
  • Video Chat
  • File Upload
  • Message Quoting
  • Emoji (standard and custom emoticons)
  • Fuzzy Name Completion (find/mention users from partial inputs)
  • IRC Bridge (for old school users who prefer to pipe everything to IRC)
  • Open Source repos (so teams can contribute features to the platform)
  • Data Portability (import/export team data for archive/platform migration)

None of the platforms I considered supports every one of these features. In fact, out of a possible weighted score of 50, no platform scored 40 or better. Additionally, each product has unique features that differentiate them form the pack in different ways. It is my hope that each platform in this space will continue to challenge each other and improve, as the end user is the one who benefits most from the increased competition and race to innovate. Ultimately, though, it comes down to which features are most important to each individual team in order to determine a best fit. 

A Note About IRC:

I included IRC in my comparison even though it’s not a “platform”, per-se, because it often gets mentioned as an option in these discussions. However, scoring it proved difficult due to client fragmentation; many of these features are more client sugar than anything else, so while an individual user could customize their experience to get these features, I tried to consider the cross-section of what an average user would have access to by picking one of the many available IRC clients. IRCCloud, on the other hand, is a specific platform that merited a separate consideration given its more modern feature set.
Ember Addon Nomenclature October 17, 2015

Let’s say you’re browsing through EmberAddons or EmberObserver looking for some new projects that might benefit your application. You stumble across two similar looking addons, Ember-Simple-Auth and Ember-CLI-Simple-Auth. Based on the names alone, what do you think the difference is? Some of you may already know about these projects, but let’s say you didn’t. Originally, Ember-Simple-Auth was not an addon at all, and Ember-CLI-Simple-Auth was the addon wrapper that allowed developers to include the main project in their applications. This could be reasonably deduced by the chosen names at one point.

However, now both projects are published as addons; Ember-Simple-Auth supersedes Ember-CLI-Simple-Auth, which is now deprecated after the main project was converted to a full addon. Is that confusing? Maybe, but I think that was a better choice than re-publishing under the Ember-CLI-Simple-Auth name (leaving aside the breaking changes for people using the old packages). Let’s look at a few more examples to see what I mean:

What can we take away from these names? The obvious difference is that some of them are prefixed with “Ember-CLI-”, and others just “Ember-”. Does that indicate any commonalities between them? I’d say yes, definitely. 

The “Ember-CLI-” addons all share a primary goal of adding functionality to your app during builds or from the command line. For example, Ember-CLI-Deploy and Ember-CLI-Release both provide `ember` commands, whereas Ember-CLI-Font-Awesome and Ember-CLI-Autoprefixer are wrappers for third-party code to be included and run with the app.

The “Ember-” addons instead aim to provide you with abstractions of reusable Ember objects that might otherwise live within your app. Ember-Bootstrap and Ember-Paper both bring in stylesheets for UI frameworks, and all three provide components to utilize in your projects.

Confusing Addon Names

The point I’m trying to get at is that these addons all use their names meaningfully. This isn’t a new idea, by any means, but there are still projects out there that make the above associations less distinct. I’m not making a dig at the authors of those addons, many of which are quite wonderfully built, but let me show you a few instances:

In these cases, the first three addons all primarily provide components, helpers, services, etc to be consumed within your Ember application. Conversely, Ember-Browserify and Ember-Sprite both affect Broccoli’s tree processing to compile files for your app at build time. Any conclusions we had made about naming patterns previously are now shattered by encountering an array of projects that defy those assumptions. To be fair though, some of this naming confusion comes from a time when Ember CLI wasn’t the default path for building Ember Apps, so there are many older addons that carried the “Ember-CLI-” prefix as a way to differentiate themselves from Ember packages that were not addons at all. Nowadays, addons are the blessed approach to integrating with an Ember app, so it’s time for a new tactic.

What I suggest is that we lay out some guidelines for naming addons in order to improve the future ecosystem and make it easier for new developers to tell at a glance what kind of addon they’re looking at. Some of us have already discussed this idea in the past, but still I feel that its understanding and adoption is not widespread. I’d like to propose three main “categories” at the moment, though I’m sure with community input we can find even more useful classifications.

Ember-CLI- Addons

Addons that primarily deal with Ember-CLI as opposed to Ember directly should be prefixed with the “Ember-CLI-” convention. This includes addons that augment the build (such as linters or preprocessors) and those that add new CLI commands, to name a few. Some great examples of these kinds of addons are:

Ember-Data- Addons

Addons whose goal is to provide data adapters for various APIs or other functionality specific to Ember-Data should be prefixed with “Ember-Data-”. This makes it easy to spot addons that will enhance your data access layer, such as these:

Ember- Addons

Finally, addons that provide objects that will live in your applications themselves belong in the “Ember-” category. This includes projects with components, services, helpers, and so on; essentially, any addon that primarily adds files to the `addon/` and `app/` directories deserves this classification. A few of my favorites that follow this pattern are:

Other Addon Types

Obviously, not every addon fits into this pattern. For example, testing addons make up a large chunk of the Ember ecosystem. Perhaps the answer is to create an “Ember-Test-” prefix for them, but arguably there are cases where it might be semi-redundant, such as Ember-QUnit. There are certainly some niche use-cases that need to be considered carefully, and there are always exceptions to the rule. There are many addons that already follow these conventions, and some addons, such as Ember-Async-Button, were renamed from their original “Ember-CLI-” prefix to better indicate their purpose. I’m not suggesting that the entire existing ecosphere undergo a renaming revolution all at once, but it is my hope that we can start a broader discussion of this topic and better align our addons with this pattern over time. This is a great path to creating an improved addon community and making Ember even more welcoming to new developers.

Ember Spotlight #5: Ember-Sinon October 14, 2015

If you’ve been following my Twitter, you won’t be surprised by this week’s Spotlight choice. Ember-Sinon is an essential addon that provides an Ember CLI wrapper around Sinon, a framework-agnostic stubbing library. Some of you may know of my own related library, Js.Edgar, and wonder why I’m promoting Sinon instead. Simply put, I wrote Edgar during a time when Sinon didn’t play nicely with Ember CLI, before Ember-Sinon existed. Furthermore, I wrote it to be a super lightweight library focused on the unit testing story for spies & stubs. It still does that very well, and I’m proud to have an easy-to-understand DSL for the API that effectively accomplishes its goal. However, Sinon was built for more extensive purposes, and it may be better suited for ambitious applications. Additionally, it has an Ember CLI addon, whereas I haven’t gotten around to writing one for Edgar yet (though you can still easily use it as a global in your Ember app). There are still use-cases where each library is useful, especially given that Sinon has some overlap with addons like Ember-CLI-Mirage. YMMV, so pick what works for you, which brings me back to the main point.

Ember-Sinon gives us an easy bridge to the Sinon library, allowing us to create spies, stubs, mocks, and more in our tests. For unit testing, this means we can test the I/O of a specific method without allowing any additional methods to be executed, so that our assertions are verifying the exact behavior we want to test. If you’ve seen Ember-Sinon before, you might know that it had a shim to integrate Sinon-QUnit, a great library that turns each test callback into a sandboxed Sinon environment, making it easy to create and cleanup spies without any manual work. However, this created a problem for two reasons:

  1. Ember-QUnit also wraps the test callbacks and executes them with a custom context from Ember-Test-Helpers, which in turn destroyed the context that the Sinon sandbox was created in.
  2. With Sinon being a framework-agnostic library, it didn’t make much sense for Ember-Sinon to deviate from that path to specifically support QUnit.

So, for my Open Source Good Deed™ this week, I decided to solve both of these problems with a brand new addon, Ember-Sinon-QUnit! This project exports a new test that properly wraps test callbacks to play nice with Ember-QUnit so that developers have a simple drop-in solution for sandboxing their spies, stubs, and mocks. Furthermore, the release of this addon enabled Ember-Sinon to drop explicit support for QUnit, which improves the story for integrating Sinon with other testing libraries, such as Ember-CLI-Mocha. In fact, mocha users could build a similar Ember-Sinon-Mocha addon that applies the same sandboxing technique to their tests. If you do, let me know and I’ll update this post to recommend it, too.

I recommend Sinon, Ember-Sinon, and Ember-Sinon-QUnit so strongly that I have added them into Ember-CLI-Opinionated’s latest release. ECO now provides a “Testing” enhancement under the extended questionnaire that includes these and other essential addons for testing your Ember applications. Regardless of how you install them, go out and improve your testing story by adding Ember-Sinon and Ember-Sinon-QUnit to your projects today!

Ember Spotlight #4: Ember-CLI-Document-Title October 07, 2015

This week’s spotlight is on an indispensable addon, Ember-CLI-Document-Title. This project takes your routing to the next level by allowing you to easily set your application’s document title on a per-route basis. Ember-CLI-Document-Title supports both static and dynamic page titles, giving you both ease of use and flexibility to meet your project’s needs. This week’s Open Source Good Deed™ was another Ember 2.x upgrade, bringing the addon up-to-date with the latest dependency versions.

I’m going to leave you with another great tip for using this addon, courtesy of some recent work by my CheckMate colleague Chris Nixon. We’re leveraging Ember-CLI-Document-Title to additionally set a page header in our application, like so:

Router.reopen({
  pageHeader: inject.service(),
  setTitle(title) {
    this._super(title);
    this.set('pageHeader.title', title);
  }
});

The page header service is then injected into a `page-header` component that uses `Ember.computed.readOnly` to read the title from the service. This little trick worked like a charm and allowed us to leverage this addon for more than just the document title. Now, we have a simple and easy solution for setting both our document and page titles via the same interface. I hope it works just as effectively for your applications as well!

Ember Spotlight #3: Ember-Redirect September 30, 2015

Ever had to deal with redesigning an application while maintaining old routes so that existing links out in the wild still hit the correct content? If so, Ember-Redirect has the answer! In the author’s own words, “this addon aims to be a simple and easy way to preform route based redirects with minimal effort.” Looking at the README examples makes it clear that this is truly the case, as redirects can simply be defined within the Ember Router and this addon takes care of the rest.

For my Open Source Good Deed™ of the week, I went through and submitted a PR upgrading the addon to the latest Ember-CLI blueprint, as well as adding a bit more interactive nature to the dummy app. As mentioned in previous Spotlights, I’ve also integrated ember-cli-github-pages so that a demo application can be easily deployed.

Looking to help out? You could submit a PR for one of the project’s few open issues or update the codebase to use modern ES6 syntax! This addon will fit naturally into the redesign of any Ember application, and I believe the Ember community needs a tool like this now more than ever as we upgrade our apps from 1.x to 2.x. Created by Travis Hoover of Yahoo!, Ember-Redirect provides a great API for maintaining old routes with ease.

Ember Spotlight #2: Ember-World-Flags September 22, 2015

This week’s spotlight is on a relatively unknown addon, Ember-World-Flags, brought to us by Francois Harbec. This project is does just one thing, and it does it incredibly well; it provides a useful Ember Component for displaying world flags by codes according to the ISO 3166-1 alpha-2 Specification. Nearly all of the 263 officially recognized countries, territories, and special areas are supported.

This addon is great if your app has any sort of International features, whether it’s allowing a user to select their home country or displaying the flag associated with a phone number based on its country code. For my Open Source Good Deed™, I submitted a Pull Request upgrading the addon to the latest dependency versions provided by Ember-CLI, as well as building a demo app that can be deployed via ember-cli-github-pages. Until that PR is merged, you can view my fork’s demo page here:

http://github.jhawk.co/ember-world-flags/

Looking to contribute to Ember-World-Flags? That’s great! There are ~40 remaining country codes that are not yet added to the repository, and your help completing the ISO spec would be greatly appreciated. Just check out the issue I opened in the project repo detailing the missing flags and open a PR today!

Check out Ember Spotlight #1: Ember-Social

Ember Spotlight #1: Ember-Social September 16, 2015

Welcome to Ember Spotlight, a new micro-series highlighting interesting and useful Ember Addons every Tuesday! For this first post, I’m going to introduce you to a little addon that’s been around for almost a year, Ember-Social! This project was initially sponsored by Plyfe, with core development from Luke Melia, Chris LoPresto, and Danielle Adams.

This addon brings you easy-to-use widgets for like/share activity on your pages. The components support features such as Facebook Like and Sharing via Facebook, Twitter, or LinkedIn. As my Open Source Good Deed™ for the week, I went in to give the project a little boost, submitting PRs for upgrading them to the latest Ember, Ember-CLI, & dependencies, documenting the README, and introducing a new Social Widget which combines several of the components into a single component so you can easily bundle them onto a page together. You can even see it in action from the bottom of this post, so scroll down and give this page a like or share to test it out!

I’ve also integrated the project with ember-cli-github-pages, allowing them to deploy the dummy app as a gh-pages demo. Read more about how to do that for your own addon on EmberUp. Check out their new demo page below:

http://plyfe.github.io/ember-social/

If you’re looking to help out with a great addon, feel free to jump in and submit PRs of your own! As stated in the README, they love contributors, and a number of people have pitched in to bring them this far. You could add widgets for Google+, Pinterest, or other social sites, or help them address open issues. Be an Ember Citizen and help out here or somewhere else. It’s Open Source, after all! 

Read on to Ember Spotlight #2: Ember-World-Flags

Ember Library #2: The Reference Section September 11, 2015

One aspect of Ember that gets talked about the most is its learning curve. Historically, it’s not been an easy framework to pick up, but that story is ever-improving. With the advent of tools like Ember-CLI and the simplification of the framework’s patterns, there’s never been a better time to learn Ember. If you’ve been in the community for a while, you already know how much better the ecosystem is getting. With the continual evolution of the framework, though, even the hardened Ember warriors have new things to learn. Fortunately, many community members have taken up the mantle of providing great resources to help you learn things the Ember way.

Lernin’ Ya Some Ember

Perhaps the most well-known resource apart from the Ember website itself is Ember Watch, a compilation of meetup/conference talks, screencasts, podcasts, tutorials, and even books. The most notable feature, however, is the Ember Cookbook, which strives to be a one-stop shop for answering the most common questions and issues an Ember developer might have. This community-driven cookbook is constantly improving and looks to be a strong resources for the foreseeable future.

Another popular resource is Ember Screencasts, run by Jeffrey Biles. This site provides both free and paid video tutorials that are sure to up your Ember game. These concise twice-weekly videos give you a quick boost of knowledge right when you need it most. The site even has several video series covering topics from Form Validations to Data Tables and even the Ember Inspector.

Though there is plenty of curated Ember content to go around, don’t count out the always helpful Ember Guides. These guides are written by both the core team and the community around them, and they’re even versioned to give you insight whether or not you’re on the latest Ember release. Though they’ve perhaps gained a reputation for being outdated in the past, there is now a dedicated documentation team and future features will require documentation to be ready before they can ship with the next release.

A relative newcomer to the community is the incredibly useful tool Ember Twiddle. This site gives you a JSbin-/JSfiddle-like interface combined with the structure of an Ember-CLI project. Not only can you create separate files for a working Ember sandbox, but it will even generate components, controllers, and other files types using the Ember-CLI blueprints. But wait, there’s more! Twiddles get saved as GitHub Gists, meaning you can easily retrieve them at any point as well as share them with others. Not only is this tool useful for reproducing Ember issues, it’s also a perfect way to write tutorial examples! This project is still a work-in-progress, and there are many more features to add, but it’s definitely something you will want to start using now.

Last but not least, I’d like to give a shoutout to a few great curated lists of Ember resources. Ember Links, brought to us by Chris Masters, is an extensive set of links to tutorials on a myriad of Ember topics. The always helpful Robert Jackson has a myriad of Ember Examples in an amazing Gist as well. I really can’t do these collections justice, so go check them out for yourself!

Helping Hands

image

More important than any tutorial, podcast, or blog post are the resources you turn to when nothing is working the way it should. The people and places where you can get surefire assistance to unblock your development and keep things shiny. The Ember community has a plethora of options, all of which you should take advantage of.

First and foremost, the Ember API Docs should be your go-to source to answer any question about how the framework functions. Heck, make them your default tab, you should be visiting that often. I’ve been to the Ember.Array page so often that if I type “arr” into the omnibox, it comes up as the first result every time! This resource has proved invaluable time and again for digging into both the public api and internals of Ember to solve a difficult problem.

The official Ember Discussion Forum is your next stop on this tour. Powered by Discourse, an Ember app itself, these boards are a go-to spot for asking questions to the community. If you can’t get an answer there, your next best bet is StackOverflow, which has over 16,000 questions tagged with `ember.js`.

Of course, what better way to get a problem resolved than by chatting directly with the core team and community members themselves? The Ember Slack has nearly 3,000 registered users, hundreds of which are online at any given time. You can drop by #needhelp any time to get assistance; say hi to me while you’re there! :) Don’t forget the old standby IRC, either. Ember has its own channel on Freenode IRC, #emberjs. You’re sure to find some friendly faces and helping hands at the ready when you stop by!

image

If you or your team is new to Ember or wants to step it up to the next level, there are great training options available. Check out Prototypal, an Ember training and consultancy shop run by 3 Core Team members: Erik Bryn, Trek Glowacki, and Alex Matchneer. They give training sessions from SF to NYC as well as online, and they’ve worked with a multitude of companies to get their teams living and breathing the Ember Way.

At the end of the day, everything you need to be a successful Ember developer is right here at your fingertips. From addons to weekly news, blog posts to tutorial screencasts, the web is full of amazing information to make you more productive and solve your every issue. If all else fails, don’t forget: you can always Log an Issue.

Ember Library is a blog series covering the best in Ember Resources. Check out the previous edition here.

Ember Library #1: Addons, News & Podcasts, Oh My! September 10, 2015

The Ember Community has proven to be prolific, if nothing else. To date, there are over 1400 known Addons in Ember Land, accompanied by hundreds of articles, blog posts, videos, and podcasts explaining how to use them. The problem is, many of these addons are incomplete or outdated, and the web content along with it. Fear not, however! There are many great resources available to help you in your Ember journeys.

Finding Great Addons

Any time you want to build a new feature in your Ember app, whether it’s authentication, modal dialogs, and something totally crazy, there’s a good chance someone’s already had to build it. If you’re lucky, they were generous enough to release their work to the Open Source world as an Ember-CLI Addon. So before you go digging into the bowels of test mocking hell, stop and wonder if a solution already exists.

Now of course you could go crazy trying to scour GitHub for Addons day and night, so some helpful folks have created a few sites to make that easier. Ember Observer is an amazing resource that categorizes every addon that’s been published to npm, providing an easy discovery tool for any type of feature. Additionally, the site scores each addon based on a number of criteria, giving you an at-a-glance look at the quality of the project. If the score is less than 5/10, chances are it’s not worth your time just yet.

image

Ember Observer even has a Maintainer view, which lets you see every addon created by the same author. This can be very useful when you find a great project and want to know what other addons they might have built to go with it. Huge props to Katie Gengler, Pete Gengler, and Louis Simons for putting this project together!

Another great site is Ember Addons from Giovanni Collazo, featuring quick search functionality for addons. This project allows you to easily sort addons by name, owner, and last updated, as well as the score given it by Ember Observer! If you want to view the top addons of the entire Ember community, this is the site to use.

Ember News: Daily, Weekly, Whenever

Discovering addons is only part of the solution, however. There are always many things going on in the Ember community, and it’s hard to keep track of it all yourself. Fortunately, a number of great sites have been created to keep you up-to-date on the latest goings-on.

If you want the latest Ember happenings delivered right to your (digital) doorstep with minimal effort, look no further! Ember Weekly, curated by Owain Williams, is an email newsletter containing “the latest in Ember.js news, tips & code delivered directly to your inbox”. Yup, it’s that easy. Simply subscribe and you’ll be up-to-date on the most important developments in Ember every week. You can even browse their website for past issues to catch up on what you missed! Ember Weekly has run for 123 issues and doesn’t look to let up the steam anytime soon.

Next on our list is the EmberUp! blog by Ben Holmes and Fabian Becker. This relatively recent addition to the community has put up sixteen posts in the last six weeks, a more than decent pace to start. Their topics range from introducing useful addons such as ember-simple-auth to providing DOM rendering optimization tips. These guys definitely know their stuff, and they’ve contributed to a few addons themselves as well. Check it out!

Maybe curated content isn’t your thing, and you want a wider scope on what’s going down in Ember. Fortunately for you, Uģis Ozols has built Ember Flare, which is, in his own words, “a community driven place where everyone can share link(s) with a short description to content related to all things Ember”. This is great because even you can help expose great Ember content via Flare, highlighting your favorite posts, videos, or otherwise from around the web. Heck, maybe you even came to this post from that site in the first place!

Plenty of other Ember developers have their own blogs as well (including the one you’re on now, so subscribe below!), so be sure to check out your favorite devs to see what they’ve been up to lately.

Radio Free Ember

If you don’t like getting your Ember fix in a text format, then maybe these podcast sites will do the trick! Ember Weekend, the brainchild of Chase McCarthy and Jonathan Jackson, hosts a podcast each weekend where they discuss addons, tips & tricks, conferences, and other juicy Ember tidbits. As a bonus, each podcast on their site is broken up into segments so you can easily skip to just the parts you care about most.

Is once a week two much for you? Then maybe you’ll enjoy the twice-a-month release schedule of Ember Land, brought to you by Dockyard’s own Dan McClain and the beer-worthy Ember Core member Robert Jackson. If you want to keep abreast of what’s going on at the heart of Ember, these podcasts are your ticket.

The only site in today’s post that doesn’t feature the word “Ember” still serves up plenty of Ember-related content for your perusal. Frontside the Podcast is hosted by Charles Lowell and Brandon Hays of The Frontside, the team that brought you `emberx-select`. These guys discuss a lot of Ember and even go farther afield into general development topics that you’ll find equally relevant. They’ve also done a great job of bringing in frequent special guests from the Ember community, including the likes of Robert Jackson, Trek Glowacki, Tom Dale, Yehuda Katz, Alex Matchneer, and more!

There’s no better way to keep up with the fast-moving Ember world than these resources. Whether you’re a veteran Embereño or a brand-new Emberite, you’re sure find plenty of useful material to improve your application and find out what’s coming next. If you get stuck, though, be sure to check out Ember Library #2 for great tutorials and help resources to unblock you at every turn.

Ember Library is my newest blog series aiming to uncover the latest and greatest resources throughout the Ember community. I look forward to having you along for the ride!

Upgrading Ember: The Road To 2.0 (Part III) September 09, 2015

One of the biggest fears I hear from Ember developers is how to deal with churn and deprecations in the framework. Let me start by dispelling one common myth:

Deprecations are stopping me from upgrading my app!

The thing to understand about deprecations in Ember is that the framework follows Semantic Versioning. For those who don’t know I’m talking about, let me quote a small portion of the SemVer 2.0.0 summary.

Given a version number MAJOR.MINOR.PATCH, increment the:

  1. MAJOR version when you make incompatible API changes,
  2. MINOR version when you add functionality in a backwards-compatible manner, and
  3. PATCH version when you make backwards-compatible bug fixes.

Or, as it’s known in Ember, STICK.CARROT.WHOOPS.

This means that going from (for example) Ember 1.11 to 1.12 only introduces new functionality and bug fixes without removing the existing features your app relies on (unless you’ve utilized non-public methods). Furthermore, you should be able to go from any 1.x version to a higher 1.x without major issues, keeping in mind the above caveats about upgrading all at once. Obviously, it would be insanity to expect SemVer to never be violated throughout the history of a framework, but from what I’ve seen, the Ember team is strongly committed to this pattern.

Given that premise, I have a hard time empathizing with developers who complain about features being “suddenly” deprecated in Ember. After all, having a deprecation at all is in fact giving you advance warning of a yet-to-be-introduced breaking change which will not occur until the next MAJOR version (2.0.x, in this case). So while you shouldn’t ignore deprecations altogether, I don’t understand the mad rush to address every deprecation before upgrading. After all, nothing is stopping you from moving to the next version and then handling the warnings over time.

The Deprecation Path

Now, I won’t go into too much detail about dealing with specific deprecations; for the most part, they are well-documented on the Ember Deprecations page. In fact, let me make it even easier for you. Check out Ember-Watson, an incredibly useful addon that will automatically refactor your code for best practices and deprecations. It won’t handle everything for you, but there are several commands you are sure to find useful in keeping your project up to date with the latest community trends.

In my mind, the deprecation workflow has some very simple rules:

  • Upgrade your app before dealing with deprecations. The code you have now works (presumably), so don’t opt-in to the new way of doing things until you are ready. It’s best not to introduce the uncertainty of further regression at the same time. Besides, if you discover that your app breaks simply from updating packages, you’ve likely found a regression in your dependencies rather than a problem with your own project.
  • `ember install ember-cli-deprecation-workflow`
  • Seriously. Do it.
  • Deal with each kind of deprecation one at a time in separate Pull Requests. This will allow you to more easily test for regressions. If a particular deprecation is rampant in its frequency, consider breaking that refactor down into multiple PRs as well.
  • Don’t ignore the warnings forever; if you have several upgrades worth of messages hounding your console when you eventually reach a major version, it’s going to feel like a monumental effort to refactor your code and make the leap.
image

If you didn’t get the hint above, you really need to check out Ember-CLI-Deprecation-Workflow. I’ve given you the link twice now, so no excuses. This addon has been cited by developers as being the only thing “that made the upgrade feel possible”. While I wouldn’t necessarily go that far, it’s certainly an irreplaceable part of this process; the package allows you to track the deprecation warnings you’re seeing and then suppress them from being displayed in your console, which accomplishes three very important things:

  • It allows you to avoid the overwhelming feeling of tens, if not hundreds, of warning messages polluting your console every time you fire up the app.
  • You can easily see when deprecations are introduced into your codebase as new features are developed, because they won’t get lost in the slew of older messages.
  • Lastly, the list of warnings it maintains provides you with an actionable queue of deprecations that need to be addressed.

Inevitably, some of your deprecation warnings will come from third-party addons you depend upon. The deprecation workflow suggested above enables you to focus purely on patterns within your own code while separately opening issues or even PRs into dependent repositories to remove those deprecations as well. The setup (as outlined in the README) is quite simple:

  1. Install the `ember-cli-deprecation-workflow` addon.
  2. Run your test suite.
  3. Run `deprecationWorkflow.flushDeprecations()` from your browser’s console.
  4. Copy the string output into `config/deprecation-workflow.js` in your project.

As an added note, remember that unless your test coverage is amazing (>90%), it’s likely that running your test suite won’t reveal every warning. I suggest running the live app through all of your workflows and flushing deprecations a second time, then merging it with the test suite output.

All in all, Ember-CLI-Deprecation-Workflow is quite indispensable for creating a manageable deprecation workflow. If you’re performing your upgrades without this tool, Tomster help you.

image

By the Grace of Tomster! 

(I can’t create my own God Tomster without infringing on the trademark, so you get this lovely DeviantArt rendering instead.)

Let’s take this one step further, though. I fully recommend using `ember-cli-template-lint` in conjunction with ember-cli-deprecation-workflow. This addon will allow you to route your HTMLbars deprecations into the browser console where they can be caught by the deprecation workflow, allowing you to put all of your deprecations in the same place!

The 2.0 Path

The last hurdle I want to address is getting over the Ember 2.x hump. The main purpose of the 2.0 release is de-cruft-ification, or removal of deprecated code. This being a MAJOR release in SemVer means we do have to care about all of the previously announced deprecations; these warnings were heralding the eventual death of certain features, and that time is now. If you’ve been paying attention up to this point, you know what to do; addressing every deprecation warning should enable you to upgrade to Ember 2.0 without regression. Unlike most other frameworks, no new features were added in the initial 2.0 release, just a cleanup of outdated patterns/features that needed to make way for the future direction of Ember.

Even though the 2.x series marks a new era for Ember, the path to get there isn’t as scary as it seems. The core team (and the overall community) has done a great job laying out a step-by-step path to success, and bringing your app up to speed isn’t an insurmountable task. If you get stuck, there are plenty of resources at your disposal, many of which I will outline in my next series, Ember Library.

Good luck, Embereños. May all your fears be deprecated!

Special thanks to Thomas (@djvoa12), Spencer (@spencer516), and Ben (@bdvholmes) for reviewing this series and making great suggestions to improve it.

Catch up on the rest of this series with Upgrading Ember Part I & Part II.

Upgrading Ember: In The Real World (Part II) September 08, 2015

Keeping Ember up-to-date can be a relatively straightforward process if you’re lucky (See Part I). Otherwise, it could feel like a full-time job in its own right. If you’re building an ambitious application (and why else would you be using Ember?), it’s quite likely that upgrading has been a bit more painful for you. There are deprecations, changed internals, and all sorts of other pitfalls that can trip you up and make this task feel impossible. However, it can be done, and perhaps I can impart some tiny amount of advice to help you have a better day when you do it.

The Sad Path

Let’s start by talking about what probably won’t work for you. If you’re several versions behind (or more), I wouldn’t recommend just picking the latest version of every package your application depends on and hoping there aren’t any regressions. Blindly upgrading every dependency all at once is unlikely to be a successful strategy, and we certainly wouldn’t expect any reasonably complex application to survive such a massive change.

It may seem common sense to avoid this path, but so often we as developers just want to bump all of our dependency versions and hope they work, since we generally know next to nothing about the random third-party implementations the application relies on. However, doing this will likely lead to one of two outcomes:

  1. Your app will break into a million tiny pieces and you’ll be left with no idea what is causing the explosion.
  2. Even worse, everything will appear to work correctly, but in fact there will be unseen bugs lurking around in your code now, waiting to bite you in the ass.
image

Prepare For Unforeseen Consequences…

Now obviously, there’s no such thing as a substantial project being completely bug-free, and fear of issues isn’t a reason to avoid new versions altogether if there is some other benefit to be gleaned from the updates. Even so, blindly upgrading en masse is unlikely to be a successful approach in the long term.

If you’re worried about whether the resources and blog posts you find online contain information that is still relevant to the latest Ember release, you might be interested in checking out the Ember Community Versions project. This effort “provides helpful badges with versioning information to community resources, like blog posts”. That is, the lofty goal is to tag web content, both old and new, to mark which versions of Ember are relevant for that information. Ideally, you can use these badges to identify content that works for your current version of Ember, as well as what you should bookmark for future upgrades. This is a community project, so you can help by submitting Pull Requests for existing content you find out there on the web.

The Piecemeal Path

If running  `ember init` causes issues in your application, don’t despair! Think of that command as a blueprint (which it literally is!) for the end goal of your upgrade. Then, go back and apply the new packages in smaller groups so you can narrow down the cause of the problem. I generally follow this process:

  1. Create a branch `ember-upgrade` with all of the basic changes given by Ember-CLI and commit them.
  2. Create a second branch off master to use as a blank slate.
  3. Create a squashed merge via `git merge ember-upgrade –squash`.
  4. Select a subset of the changes (perhaps a few Bower/NPM packages that Ember depends on) and revert the rest.
  5. Test your app with these changes to see if the bug persists.
  6. Repeat steps 3-5 until you reach a state which reproduces the issue, then narrow down which package upgrade (or combination thereof) caused it.

The pattern above may sound somewhat familiar if you have heard of Git Bisect. While in this case you won’t have separate commits allowing you to utilize that amazing tool, the idea is basically the same; work through the changes bit by bit until you can narrow down where the issues start occurring in your application. This piecemeal approach allows you to perform most of an upgrade so that you can reap some benefits of new versions immediately while focusing in on a blocker issue at the same time.

image

Check out Part I of this series to learn about the optimal upgrade path for Ember.

Read on to Part III for dealing with deprecations before moving to Ember 2.0.

Special thanks to Thomas (@djvoa12), Spencer (@spencer516), and Ben (@bdvholmes) for reviewing this series!

Upgrading Ember: The Way It Was Intended (Part I) September 07, 2015

I’ve been using Ember.js for nearly two years now. Practically since 1.0 was released. That doesn’t make me smarter or more qualified, it just gives me a little more perspective [I like to think]. My current role is “Senior Front End Engineer” on an eleven person product team. That is to say, it’s my job to keep up with changes to Ember.js, help ensure best practices, file bugs, etc. I’ve also published and maintained a few add-ons. I’ve written this post in part to show you how I keep up with churn in the Ember community and in part to admit the pitfalls I’ve stumbled into along the way.

Depending on who you ask, upgrading packages in Ember-land is either one of its greatest stories or one of its biggest downfalls. Now, I’ll be one of the first to argue against the detractors that think Ember’s frequent deprecations and prompt release schedule are unsustainable for “real” development. The Ember community maintains a solid release momentum and determines necessary deprecations in order to bring about the ambitious features of a modern framework while simultaneously simplifying best practices and eliminating chaff. In fact, the “train model” Ember follows for its releases is the same concept that TC39 is using for the JavaScript language spec moving forward; work is already continuing on future releases before the next version has landed. To me, that’s a really powerful strategy that shows a commitment to moving forward and continually improving the framework instead of getting left in the dust as so many major projects have experienced throughout the evolution of the web.

However, this doesn’t mean that upgrading your application is all butterflies and unicorns. Depending on the complexity of the code, what era of Ember it started in, and a number of other factors, it can seem a daunting task to keep your project up to date.

The Happy Path

image

All that being said, a happy path does exist for Ember upgrades, and it’s a good one. If your app has followed Ember best practices and not used private library internals, you should be able to upgrade from one version of Ember to the next without much issue. Let’s say you have an app on Ember 1.10 and the latest version is 1.12. The upgrade process looks something like this:

  1. Upgrade Ember-CLI to v0.2.3
  2. Run `ember init` and say yes to all prompts (you can say no if you know you don’t need a change, of course, but I find Step 3 to be easier)
  3. Diff the changes Ember-CLI has made to your app and revert any that you don’t need (such as README, index.hbs, overwritten configs etc)
  4. Test your app to make sure it isn’t broken with the newest versions
  5. Assuming all is well, repeat steps 1-4 with Ember-CLI v0.2.7

Shazam! Your application has been upgraded to Ember 1.12. Even better, starting with 1.13.x and moving into the 2.x series, the versions for core libraries such as Ember-CLI, Ember-Data and others have been synchronized with the core Ember release. This means that if you want to upgrade to Ember 2.1, for example, you can use Ember-CLI 2.1′s `ember init` command. More information on this standardization can be found on the Ember blog.

Note: Each Ember-CLI Release explains how to upgrade the package, but I have two npm scripts that make it even easier:

“scripts”: {
  “postinstall”: “bower cache clean && bower install”,
  “clean”: “npm cache clean && bower cache clean && rm -rf node_modules bower_components dist tmp”
},

With the above, my upgrade command looks like this:

npm uninstall -g ember-cli && npm run clean && npm install –save-dev ember-cli@x.y.z && npm install

Keep in mind that you don’t want to add that postinstall script to an addon, just an application that won’t be consumed by another project via npm.

Now, some of you might be sitting there shaking your heads; there’s no way it can be that easy, right? Well, as all things in the software world, YMMV and there are always exceptions. That said, in many cases pre-Ember 2.0, you shouldn’t need much more than that. Things get a little murkier with the story surrounding other libraries tangential to core Ember, but that process is improving as well.

For those of you that are pioneers in the community, the above path may not exactly work for you. New Ember versions generally land before the accompanying Ember-CLI release, so if your team is dedicated to staying on the bleeding edge of framework changes, you may not always be able to leverage Ember-CLI for every upgrade. Additionally, dependencies that release new versions after Ember-CLI gets updated won’t be included in the `ember init` command. That’s why I heavily utilize VersionEye to track my projects’ dependencies and get notified of repo updates as they are released.

Pro Tip: Once activating VersionEye for a branch’s package.json and bower.json, you can open the bower “project” settings and merge it into the package.json “project”, giving you a combined view of both sets of dependencies in a single easily accessed page.

That said, those of us who undertake the role of a pioneer should expect to encounter more churn and issues up-front. It’s people like us whose job it is to discover problems as quickly as possible, so that when people use the Happy Path described above, they can upgrade relatively effortlessly. Besides, if you’re moving on to new versions faster than Ember-CLI can update to support it, you probably know all about new best practices and deprecations before the rest of the community anyway, right?

Check out Part II of this series for what to do when the Happy Path just won’t cut it. Then, learn about dealing with deprecations in the finale, Part III.

Special thanks to Thomas (@djvoa12), Spencer (@spencer516), and Ben (@bdvholmes) for reviewing this series!

Ember-Tumblr v0.6.3 September 06, 2015

The latest version of Ember-Tumblr has been released! This new version brings the addon up to Ember-Data 1.13.11. Please test and let me know if there are any issues!

The addon has a shiny new demo page, too. Check it out here: github.jhawk.co/ember-tumblr

Coincidentally, my website has also been updated to E-D 1.13.11, so hopefully everything is still working. :)

Project Updates August 25, 2015

I’m happy to announce recent updates to a few of my favorite Ember projects:

Ember Tumblr

My latest Ember addon, Ember Tumblr, has been updated to Ember 1.13.8! Next up, I’ll be upgrading Ember-Data and moving the addon to 2.0 as soon as possible.

Ember Bug Widget

Ember 2.0 is on the horizon for Ember Bug Widget as well, which got its 1.13 upgrade last month.  Keep an eye out for an imminent update!

JordanHawker.com

My personal website received its own Ember 1.13 upgrade recently and will be moving to 2.0 soon after Ember Tumblr!

Jordan Hawker CLI

I’m proud to announce my latest project, Jordan Hawker CLI! This NPM package gives you quick access to my latest portfolio straight from the command line. Check it out!